A developers guide to JobRelay
JobRelay is a tool that simplifies the integration process of a job posting service (Broadbean, Idibu, LogicMelon and JobAdder) with WordPress. It takes care of the tricky stuff such as processing data and saving it in WordPress, allowing WordPress developers to focus on WordPress development such as job display and search.
This overview talks through the main features of JobRelay and how the system works.
How does an integration work?
Any integration with a job multi-posting service has 3 parts.
- The posting service develop a method of posting (sending to a URL) job data to your website. This is often referred to as “building a feed” of data to your site.
- A URL, known as an “endpoint” is developed in WordPress, to which the posting service send the data to, about jobs. This endpoint should process the data and then save it into the WordPress database.
- Your WordPress site reads the saved data from the database and outputs jobs and associated functionality on the front end. This usually including search, a job listings page and a single page for each job with an application form.
Where does JobRelay fit in?
Looking at the list above, JobRelay takes care of points 1 and 2. We are already integrated with the posting service and therefore they have already created the “feed” of jobs to JobRelay. No development, only setup is needed on the posting services side. This cuts down the lead time to live.
JobRelay provide you with a connector plugin to add and activate on WordPress. This does 2 things:
- It adds an endpoint (URL) to your website which the job data from the posting service is forwarded to via JobRelay. This endpoint must always be available.
- The job data is processed and then mapped to be saved in WordPress where necessary so that your WordPress site can carry out number 3 above.
Put simply, the role of JobRelay is to make sure that the data arriving from the posting service is saved correctly in WordPress, ready for your WordPress site to use this data however you choose.
How are jobs saved in WordPress?
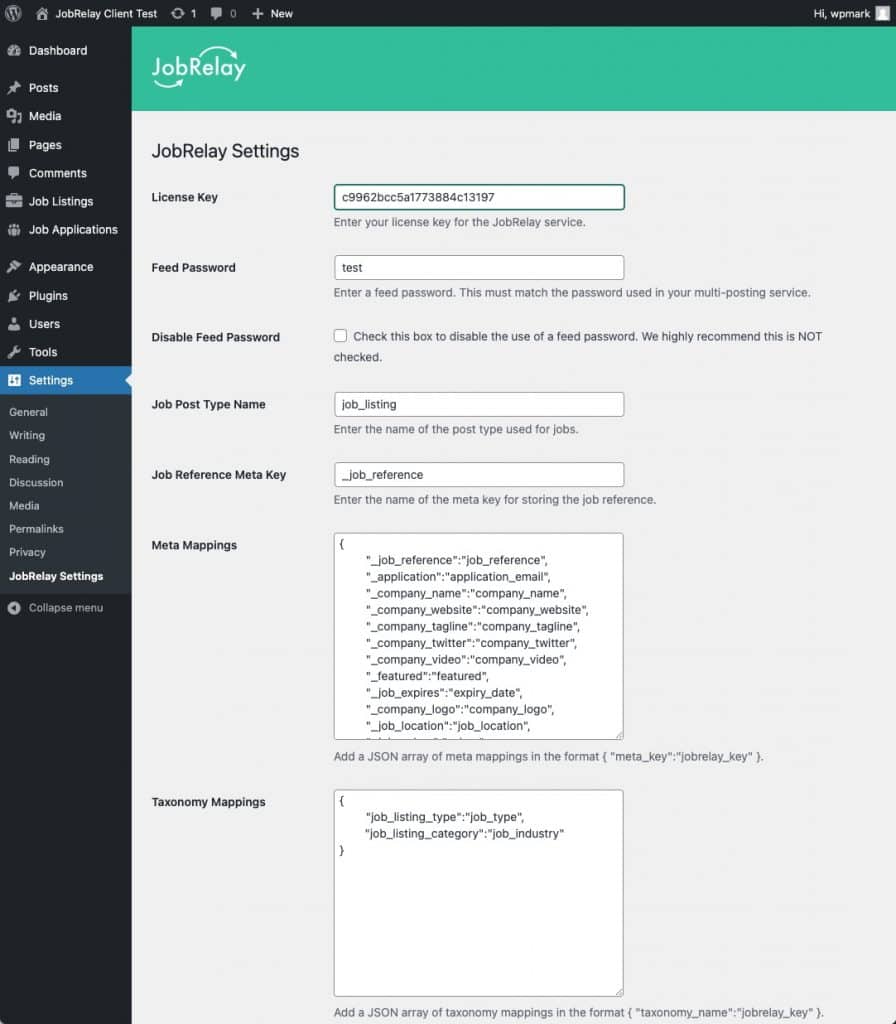
When jobs arrive at the endpoint URL, our connector plugin has settings to tell WordPress how to save each job.
Your WordPress site needs to have a custom post type for jobs, and the data is then either saved as post meta or as taxonomy terms, associated with the newly created job post, of that post type.
Many WordPress sites are already running a WordPress job board plugin, such as WP Job Manager. These plugins already provide a custom post type and associated fields and taxonomies which JobRelay can use to save to job data too.
However, it is often the case that WordPress sites have a more bespoke approach, for example using a custom post type with something such as Advanced Custom Fields to provide the job data fields.
From a developers point of view JobRelay can save the job data in 2 ways:
- As meta data (using
save_post_meta()) - As terms within defined taxonomies
How is data mapped to be saved in the correct place?
Firstly it is worth mentioning that all the mapping of data (i.e. save the value of job salary to a custom field in WordPress with the meta key of job_salary) is included as part of the JobRelay cost. However it is also worth outlining how this happens here.
JobRelay comes with a settings page which is used to setup the connection and provided the mapping of JobRelay data to WordPress data.
Any of the data fields that arrive at your website can be mapped and saved in WordPress using this settings page. We tell WordPress which post type to use as well as where to save the data.
Find out more about JobRelay to WordPress data mapping here.
What JobRelay does not do
JobRelay is not responsible for jobs functionality on your WordPress site. This means the following is not the role of JobRelay:
- Presentation and design of jobs on the front-end of your site. This is up to your theme or your chosen job board plugin to output the jobs. It is likely that you will need:
- Job listings page to list all jobs
- Single job post pages for displaying a single job
- Application form
- Job search
- Expiration of jobs once their expiry date is reached – a jobs expiry date should be saved as meta data (a custom field) against the job post
- Delivering application emails