JobRelay screen settings
In this article
Once you have uploaded and activated the JobRelay WP Connector plugin to your WordPress site, the plugin needs to be configured.
The JobRelay settings page can be found in the WordPress admin area under the main Settings menu.
Plugin settings
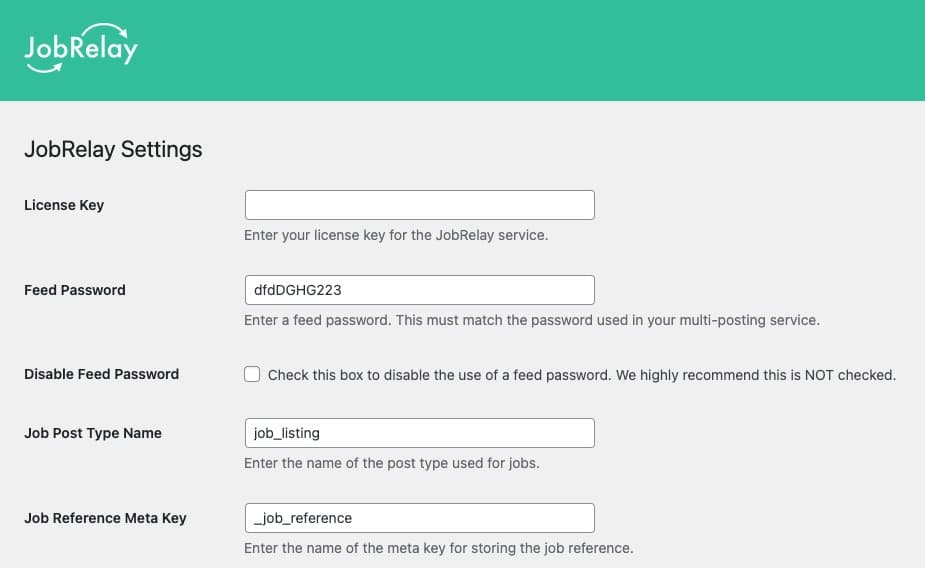
The following settings are available to configure.
License key
You should enter the license key from your confirmation email into this field. You can also access your license key from the purchase history page once logged into your JobRelay account.
Feed password
To authenticate your feed and prevent others from posting jobs to your site without authorisation, you should set a feed password. This can be anything you like. We would recommend upper and lowercase letters with some numbers. Symbols, on some servers have been known to cause problems, so best to leave them out.
You don’t need to remember you feed password, therefore set it to something nice and random and at least 12 characters long.
Job post type name
This is the name of the post type of which a new post will be created when a new jobs arrives from your posting service.
If you are using the WP Job Manager plugin to power the job board functionality on your site, we want JobRelay to create a new job using its post type. The WP Job Manager custom post type is called job_listing.
Job reference meta key
This is the name of the meta key that is going to be used to store the job reference when a job is saved. This can be any meta key of your choosing and is must also be added to the meta mappings (see below).
If you are using the WP Job Manager plugin, it makes sense to use the meta key of _job_reference as this field is then added to the post edit screen automatically.
Meta mapping
This setting is used to tell WordPress which job data arriving at your site should be saved a post meta, against the newly created job post.
Find out more about meta mappings here.
Here is an example you can use which works for the WP Job Manager plugin.
{
	"_job_reference":"job_reference",
	"_application":"application_email",
	"_company_name":"company_name",
	"_company_website":"company_website",
	"_company_tagline":"company_tagline",
	"_company_twitter":"company_twitter",
	"_company_video":"company_video",
	"_featured":"featured",
	"_job_expires":"expiry_date",
	"_company_logo":"company_logo",
	"_job_location":"job_location",
	"_job_salary":"salary",
	"_job_salary_currency":"salary_currency",
	"_job_salary_unit":"salary_per",
	"_remote_position":"working_arrangement"
}
Taxonomy mappings
These are the same as meta mappings with the different being we are going to indicate which data is saved as terms in a WordPress taxonomy, rather than as meta data.
Find out more about taxonomy mappings here.
Here is an example you could use which works for the WP Job Manager plugin.
{
	"job_listing_type":"job_type",
	"job_listing_category":"job_industry"
}
Field listings
The field listings input can be used to outline any specific field values for a given field. You would add this as a JSON string like so:
{
	"custom_field_1": {
		"item_1":"item_1",
		"item_2":"item_2"
	}
}
Let’s say you are using a custom field (sent in the feed as custom_field_1) and you want to make sure that the dropdown input in the posting service has specific options, this is what you could add to make sure these are added to the field listings endpoint.